This brioche-style bread is decorative to serve as the centrepiece of any celebration, as it gains its warmth and flavour from the addition of roasted pumpkin (or butternut squash).
The recipe is a modified version for the burger buns from my cookbook, *My Sisters’ Cookbook-Food and Menopause* (learn more here).
Why do I love Easter?
Easter brings back sweet, warm, and sunny childhood memories for me. It was also my father’s favourite holiday, as it reminded him of his own childhood. Back then, there was a special tradition: children would dress in brand new clothes for Easter Sunday. Since new clothes were a rare treat, this made the day feel particularly special. Imagine a child, beaming with happiness in shiny new attire—often, that was enough to make anyone feel truly unique.
Once dressed up, my father and his siblings would visit their godparents, carrying gifts such as a homemade cake and decorated eggs. In return, the godparents would give them a little pocket money—another highlight for my father.
Somehow, in my mind, it was always sunny on Easter Sunday. My mother would dress my sister and me in our finest dresses, and together we would head to my maternal grandparents’ house for a special Sunday lunch, bringing along the torte she had baked. Of course, the mornings were always the best part. Easter was all about the eggs—hard-boiled, brightly coloured, and carefully decorated.

The highlight was the egg-cracking game: each of us would try to have the strongest egg, the one that could break all the others. If your egg lost, you’d dash back home with your broken egg and fetch another one to continue the fun. When my father was a child, in more frugal times, the winner would keep the eggs and eating them was the reward. For us, though, it wasn’t about the eggs themselves; it was simply about the joy and excitement of the game.
Decorating the eggs—a tradition passed down from my paternal grandmother—was always done on the preceding Thursday, and it brought with it great anticipation for Sunday. I loved this ritual as a child, and I still enjoy it, even though it has become a solitary activity for me these days. When my sons were young, they loved it too; we would decorate eggs together, and it was fun for all of us.
On Easter Sunday, I would prepare a special breakfast, something out of the ordinary, and we would crack the eggs. There were always some tulips around, as they symbolise spring and Easter for me. Even now, I still dress up for Easter.
About the bread
While the below recipe requires some advance planning, it’s perfect for weekend indulgence. To streamline the process, consider roasting the pumpkin a day in advance and preparing the dough in the evening, allowing it to rest in the fridge overnight. For added convenience, keep pre-measured portions of roasted pumpkin in the freezer to simplify future bread-making endeavours.
When we refer to “advanced planning” in this recipe, it means the dough is mixed in the evening and left to prove (or “rise”) in the fridge overnight. In the morning, simply remove it from the fridge, allow it to come to room temperature, then shape it according to the instructions provided.
It is worth noting that pumpkin and butternut squash boast a rich carotene content, which contributes to improved bone health.
The upcoming Easter might be the perfect occasion for this.


Celebrate Easter with Pumpkin Star Brioche Bread
Celebrate Easter with Pumpkin Star Brioche Bread
For this fluffy, festive star-shaped brioche bread, the dough is made with roasted pumpkin and seasoned with pesto of your choice.
Ingredients:
- 500g roasted pumpkin/butternut squash ( If pumpkin has been defrosted, drain any excess liquid.
- 700g strong flour, plus extra for dusting
- 1 tsp salt
- 150ml milk t
- 1 tsp sugar
- 7g dry yeast
- 1 egg white (Keep the egg yolk in the fridge for the following day.)
- 1 Tbsp white wine vinegar
- 50g soft butter, cut in cubes
- Sesame seeds or nigella seeds to sprinkle
- Large mixing bowl
- Large baking tray
instructions:
Leave the butter at room temperature to soften up, and cube into small bits. Puree the pumpkin.
Preparing or activating yeast:
In a small saucepan, warm the milk until it reaches a temperature that is warm to the touch but not hot. If it becomes too hot, allow it to cool before proceeding. Add the yeast and sugar, then stir gently once or twice. The yeast is ready when it becomes foamy and bubbly, typically within 15 minutes, depending on the room temperature.
the dough:
If you’re not using a kitchen robot, mixing the dough will be quite a workout, especially during the final phase when kneading in the butter.
1.Begin by weighing the flour in a mixing bowl, then add the salt and mix manually.
2. Next, incorporate the activated yeast and the remaining ingredients, excluding butter. Allow the machine to work the dough until all the ingredients come together into a smooth mixture.
3. Gradually add the butter, cube by cube, ensuring each addition is kneaded into the dough before adding more. The dough is ready when the final piece of butter is fully incorporated. It will be quite soft, but don’t worry; it will become easier to work with after refrigerating overnight.
4. The following day, allow the dough to come to room temperature before proceeding.

how to shape a star:
1.After proving, transfer the dough to a lightly floured surface and shape it into a ball.
2. Gently press the dough with your hands to form a disc approximately 20cm in diameter.
Using a sharp knife, divide the dough into four equal portions, shaping each one into a ball. Use a little flour if necessary to prevent sticking. Cover the dough balls with cling film to stop them from drying out. The dough should be soft, smooth, and easy to handle.
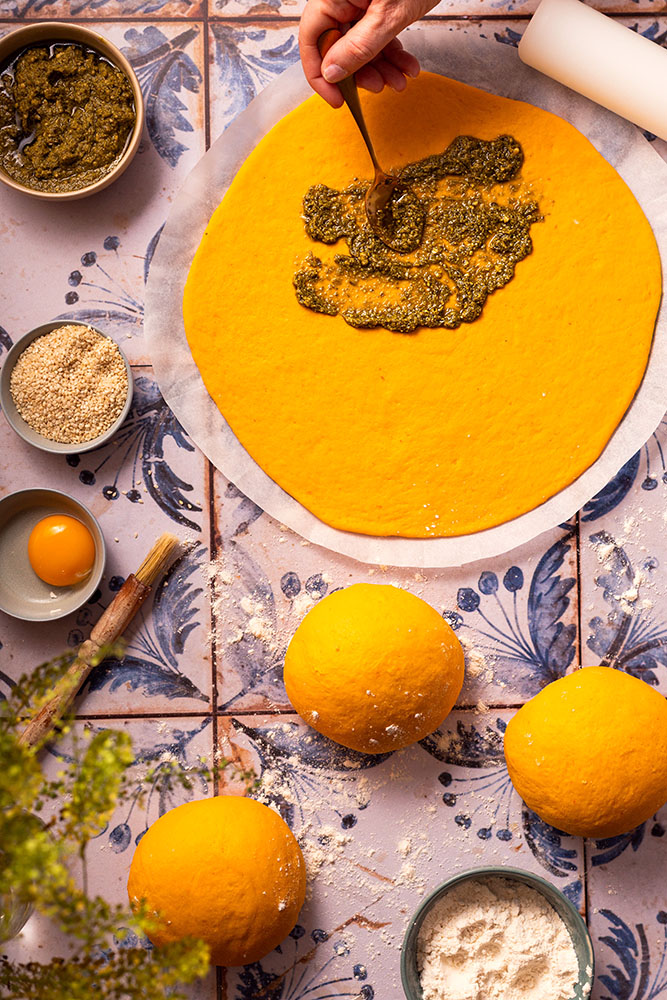
3. Take a large sheet of baking paper. Lightly dust your rolling pin and the work surface with flour. Roll out the first dough ball into a circle about 30cm in diameter, then transfer it onto the baking paper.
4. When rolling out the dough, gently toss, rotate, and turn the dough circle upside down to prevent it from sticking to the surface and to ensure both sides remain smooth. To achieve as regular a circle as possible, rotate the dough sheet after every few strokes with the rolling pin.
5. Spread the pesto evenly over the rolled-out dough, then transfer it, along with the baking paper, onto a baking tray. When spreading the pesto, always leave a 5mm border around the edges free from pesto.
6. Repeat this process with the remaining three portions of dough, spreading pesto between each layer.
7. The top layer should remain free of pesto.

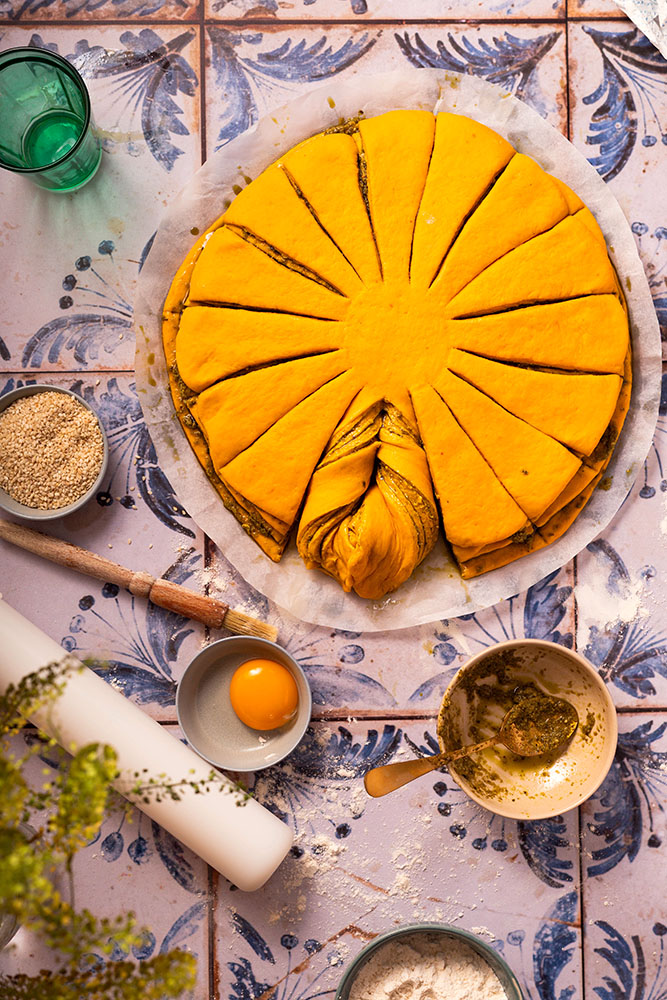
8. Take the glass and gently press it into the centre of the dough to make a print. Be careful not to press too hard—the area within the glass print should remain untouched. When cutting out the star shape, you’ll be slicing the dough from the edges up to the glass print. Once finished, it will resemble a sun, with rays shining outwards.
9. Using a sharp knife, cut from the edge of the dough up to the mark left by the glass. Make a second cut directly opposite the first, dividing the dough into two equal halves.
10. Next, cut each half in two, then each quarter in two, and finally each eighth in two, so you end up with 16 equal sections. When positioning your knife, use the glass print in the centre as a guide. If the mark becomes difficult to see, simply press the glass down again to refresh it.
11. Now, lift one part with one hand and the one next to it with another hand. Rotate in the opposite directions, one part clockwise and the other anticlockwise. Make three swirls and pinch them together at the ends. Make sure that the parts are tightly pinched, glued together so the stars won’t unfold while baking.
12. Repeat for the rest of the “rays”.
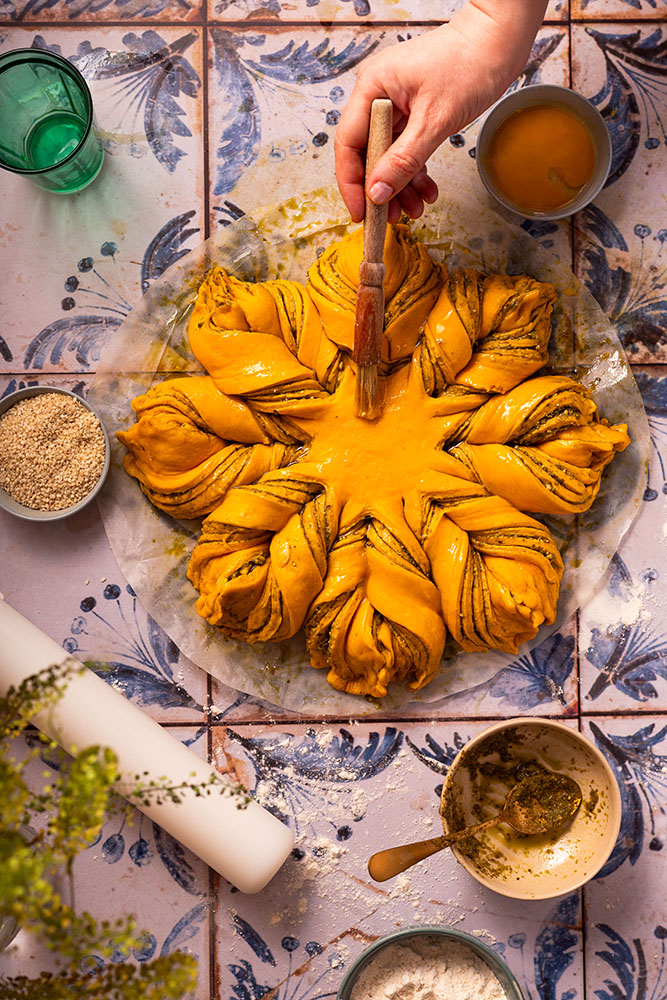
13. Cover it and let it rest for 20 minutes.
14. Few minutes before the time is up, turn the oven on to 170°C with the fan on.
15. Brush with the yolk and sprinkle with the sesame seeds.
16. Bake in the preheated oven for 35 minutes, then rotate the tray and bake for 15 more minutes.


Leave a comment